Quantcast
Channel: Nietzsche mephistopheles
Viewing all 80 articles
Browse latest View live

Perfect Top Knot

$
0
0
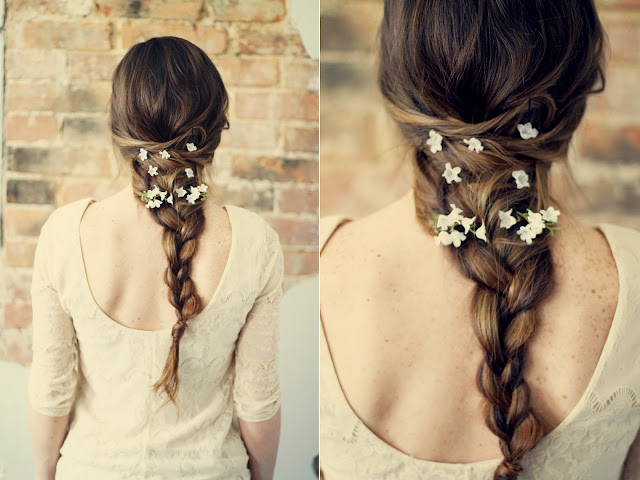
There's nothing more atractive than a beautiful messy top knot. If you're running late on a date, or something, there's an easy technique to achieve. It's most known as the french twist. Or a knot, I'm not sure.Take a try on this amazing hair tutorial from A Cup Of Jo, that will blow you away. Would you ever wear your hair into a knot?


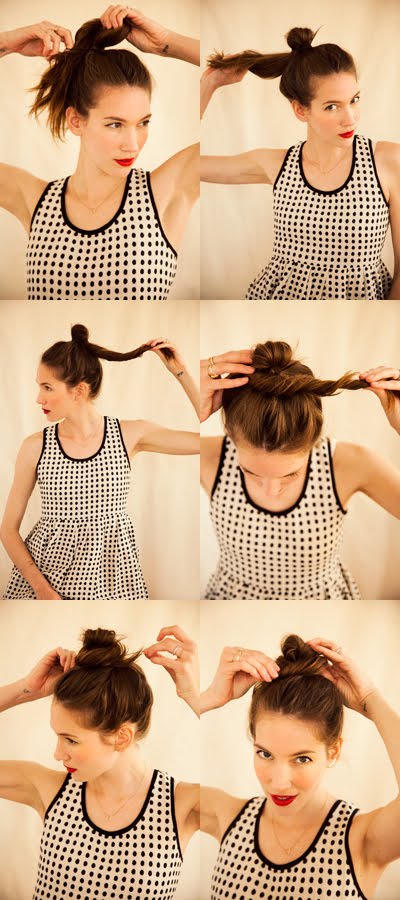
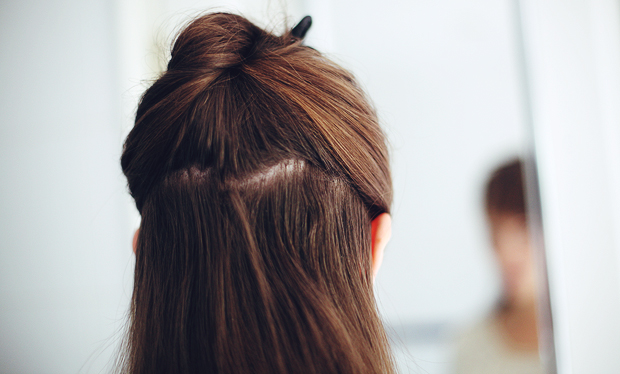
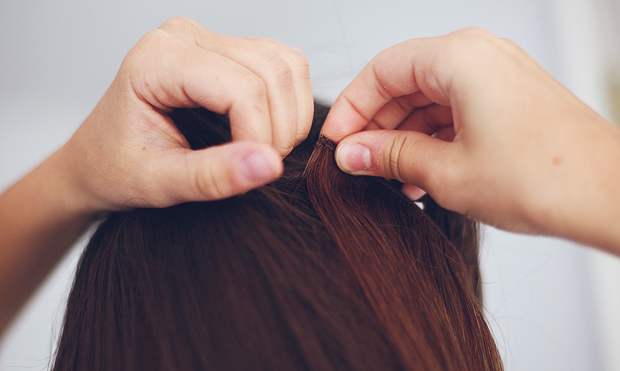
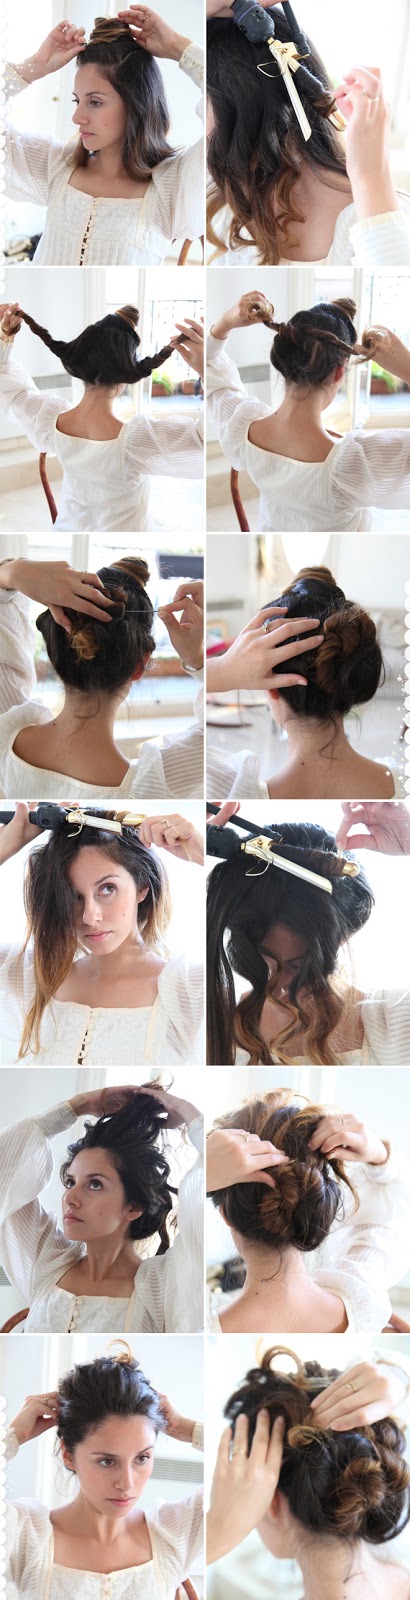
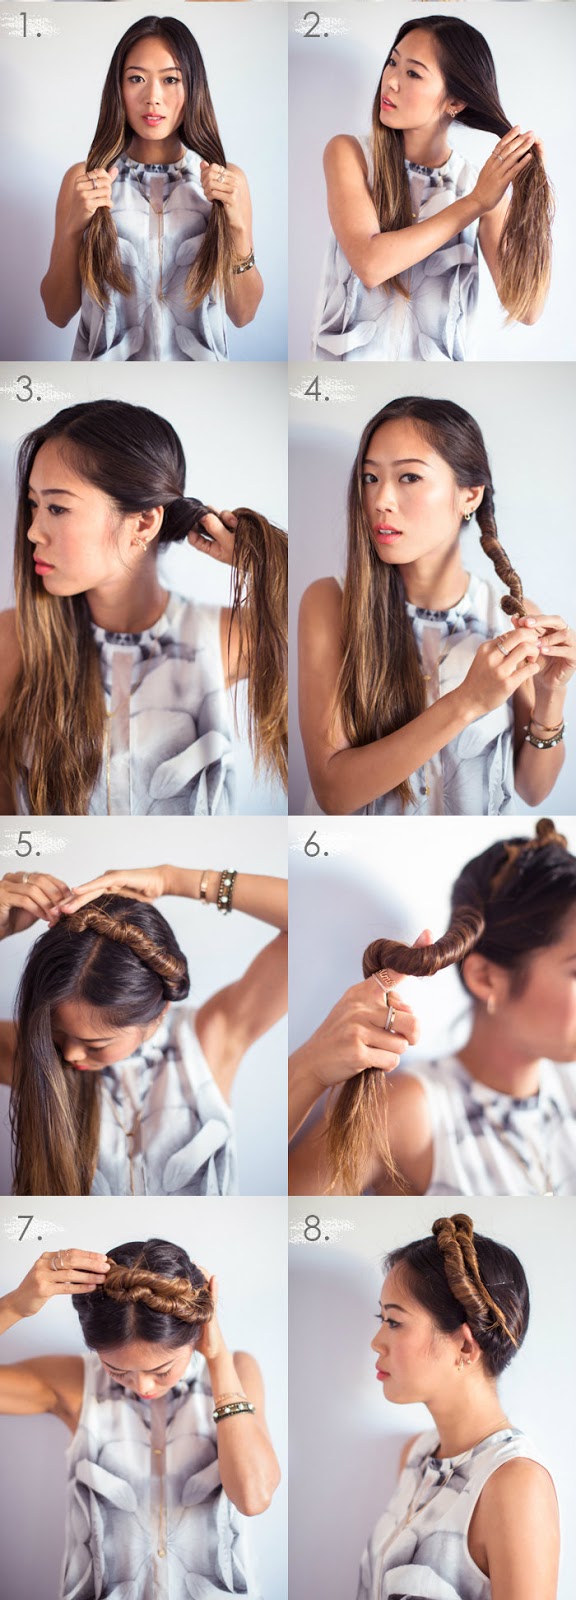
"1-2. Start putting your hair into a high ponytail, but don't pull the hair all the way through the rubber band. You want to end up with a little loop on top with some hair left over at the bottom. (By the way, I love doing a top knot on hair that isn't combed through, so I use my fingers to get my hair into place; that way, keeps some of the imperfect lumps and bumps. If you prefer a more polished look, you can comb your hair into a sleeker ponytail.) Tip: If your hair isn't quite long enough to get a top knot, you can also wear the knot lower down on your head.

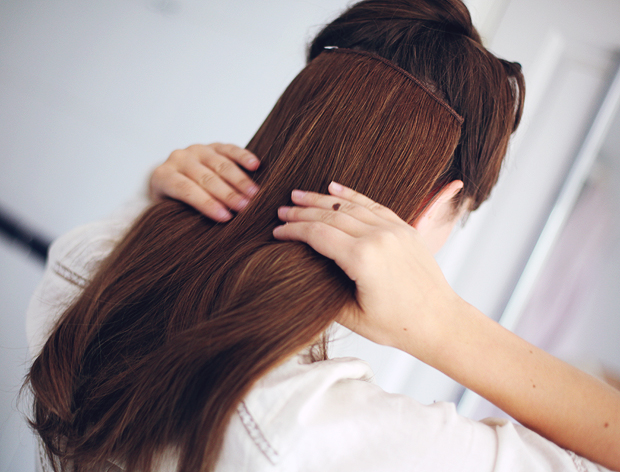
3. Take the section of hair that's free from the rubber band and twist it.

4. Take the twist and wrap it around the base of the little loop of hair you created. If you have long hair, you may need to wrap it more than once. If you are wrapping it a few times, do it loosely…you don't want it too tight and rigid.

5-6. Use bobby pins to pin the bun in place. I like to secure my bun with four pins: one in the front, one in the back and one on either side. You may have to use more if you have thicker hair. I've also found that "U" shaped pins work better to hold thicker hair. These specific pins are great because they have a rubberized texture that helps grip hair." 


Summer Nights/Floral Hair Tutorial

$
0
0
This tutorial is very girly and femmene, perfect way to combine braids and flowers. To be presice, the cute small wildflowers. It's simple, using the overlapping technique, and the basic braid, you can get this look in no time! Thanks again to Sincerely, Kinsey for sharing this amazing tutorial.


Preparation: You can curl your hair a day before, just so it will be easy to work with it. You'll need bobby pins and wildflowers (real or faux). Ok, start with your hair down. Begin with a small strand from each side of your head, close to your ear, warp it around to the opposite side and pin it (like in this tutorial). Repeat the process ntill you get the look from the fourth picture. After that, create a semi-loose braid with the best of your hair. Lastly, add flowers throughout your braid! 

Have a nice day friends! 

Total Makeover!

$
0
0
See the new layout?! Well, I just made it! I also just made my Pinterest account, don't forget to follow me! My blog is really startting to grow, so I'm opening adversting on my blog! After I'm done with all the details, you can send me an e-mail, and get an adversting spot here! I'm so excited!

What do you think about the new layout?


Also don't forget to check out the tutorials! I've linked them all, but there's gonna be just this untill I update some new and old hair tutorials. You can't blame me, there's just too much of them! But, if you really want to see some more, just type in the search bar, hair. They're all tagged with it.  

Ponytail Twist

$
0
0
How often do you wear ponytails? They're so cute and there's nothing more trendy when you spice it up a little bit. The hair is very vital part with your everyday look. It can tell exactly how much you take care of it. And when you srtyle it, it can give a completly different look. So if you're looking for some great ways to spice up your hair, try this amazing 5min. tutorial from A Cup Of Jo.


Split your hair into two sections, straight down the back, but off center, about 3/4. You want one large section, and then one smaller section that's about an inch or two away from your ear. Than take the larger section and make a ponytail, securing tightly with a rubber band. Twist the smaller section AWAY from your face. Make the twist as tight as you can, so it doesn't become too loose later on. After that, wrap the twisted section over the top of the ponytail and around to the bottom. Pin the twisted wrap in place. After you've secured the twist with enough pins, let it untwist and blend in with the rest of your ponytail. Done and done! SO easy!


Loose Floral Updo

$
0
0
Effortlessly romantic, this simple twist is easy, versatile, and irresistibly femminine. Wear it loose and tousled for a bohemian effect. Floral headbans like this one, are so beautiful and always welcome on weddings. Katie from Skunkboy blog did this hair tutorilal on Etsy, Bridal Beauty, and I must say that this combination with a loose twist bun goes perfect with the flowers. Try it out!


Gather the hair on the top of your hair (where you want the bump to be) snd tease it. Take the hair and smooth the top and gather the sides. Start twisting the section of the hair into a half bun. continue twisting to make a bun. Pin everything in place and add a touch of flowers, lace, bows or whatever you like! 


Hair Extensions for Beginners

$
0
0
Well yes hair extensions! They can be very helpful when it comes to styling. It's actually very obvious why they're so important. The hair it's self is human, and of the best quality, so it's also very important to find a great quality hair extention clips. Why clips? Well they're the easiest to insert. I recommend HeadKandy extensions because the set comes with a lot of hair. Which is great if you want a real natural look.
I've learned all that in the Hair Extention for Beginners post from the amazing blog named WhishWhishWhish.

The colour is the least of the problem. You can always email the team and they would recommend you the colour that might fit you the best. So no worries about that. Insering them is very simple too, and even if you don't really get it this time, you can always check some videos. After some practice, if your hair colour is not completely matching the hair extensions colour, learn how to blend it all out! 


To put them in, you simply part your hair, clip up a section, backcomb at the roots slightly so the clips have something to grip, and clip away! There is a guide that comes with your extensions that tells you exactly where to put which section of hair, and each section is also numbered in the order you insert them too.

It all just takes a little practice. Do you use hair extensions?

Ashley Benson's Loose Curls/Apreciacion Post

$
0
0
Wow, 40,124 views are mind-blowing!! And I've got to thank my amazing 40 followers, for following and reading! This blog started just as an idea, nothing more. Then when I made it, and started posting, it was really boring, there was no one to even view it. But, I don't know why, I never stopped writing and posting... that led to me desinig my blog for the first time. I liked it, and so my blog kinda lived up. And look at it now, I could never imagine that happening, so thank you!


And to show you my apreciacion, here's an amazing tutorial. I was getting requests to post an medium length hair tutorial. I was thinking that curls look great on that length. Sure, all of you are familiar with the Pretty Little Liars series. I fel in love with Hanna's curls. They have that beachy, summery look, and it's easy to achieve! I love it! For extra tips and products that could help you with the look click here!


Who's you favorite character in PLL? Mine is Hanna! 

Glamorous Up-do

$
0
0
I've always loved these kinds of updos, like beehives. They look so glamorous and vintage, and if it sometimes ends up looking messy, you can't make a mistake, messy updos/beehives look amazing! And the deep slide gave it a chic touch and with that finishend the look. I just wish I had all that hair to experiment with these kinds of hairstyles... well I can only wait. Visit Bobby Glam for the original tutorial. 


 You need to section your hair off to fit the hair booty, leaving enough hair to cover the it. You can backcomb the roots of your hair if you are looking for an extra volume lift for this style. You can get the deep slide by parting your hair so it is in line with the arch of your eyebrow. Once you have sectioned off your side parting, secure in place with bobby pins. 

Next you need to section your hair into two different sections. Using the end of your comb, begin from the top of your ear and work around your head to create a neat parting which separates your hair into two sections. Neatly tie the top section of your hair into a ponytail using your hair band to ensure it stays put. Now it’s time for the styling of the hair left down! It's always nice to add some extra flicks to the ends to get the retro vibe. 

You basically straighten your hair until you get to the ends where you turn your wrist and flick the iron up. Spritz all over with hairspray and neaten up any fly-aways. Easy! 

Beachy Waves, Kristen Stewart Way

$
0
0
Hey everyone, sorry for not posting anything for these few days. I guess I'm feeling a little uninspired.... but I think I'm getting back my inspiration with the amazing beachy waves that are Kristen Stewart's signature look. They look so youthful, fun and intentionally made to look "undone". Kristen is one of my favorite actresses, and I just love her style in general. So when my hair grows back, I'm definitely gonna try it!

This is Kristen for the 2009 MTV Movie Awards. These beautiful messy, sexy waves will never get old, and they're so easy to make! Take a look at this video:


Kristen Stewart chose the 2011 MTV Movie Awards to showcase no fuss no muss hairstyle. And she did it well, combined with the red safety pin custom made Balmain dress. To recreate Kristen's low-key yet sexy spent-the-day-at-the-beach waves, here is the tutorial:

Fekkai Celebrity Stylist Adir Abergel created a raw rock and roll style for Kristen. SoAbergel started by applying the Fekkai Advanced Full Blown Volume Styling Whip throughout and rough dried the hair. Once dried, he re-applied the Fekkai Advanced Full Blown Volume Styling Whip and re-dried the hair to create a natural wave. He then backcombed the hair from roots to ends spraying Fekkai Coiff Sheer Hold Hairspray and slightly ironed the hair. Finally, he brushed the hair to form the texture of the hair.
All products by Fekkai: Advanced Full Blown Volume Styling Whip ($23) and Fekkai Coiff Sheer Hold Hairspray ($24). Available at Fekkai.com and Nordstrom, Neiman Marcus, and Saks Fifth Avenue stores.
As she walked in the red carpet during the recent 2012 MTV Movie Awards, you can’t help but love her in her quirky lime and silver mini-dress, and of course, her signature wild tousles that a lot of girls would kill to achieve. She was all rock glam, and gorgeous! Here's an no-heat tutorial: 

Wash your hair with a shampoo and conditioner (do not comb it but do brush it before washing). Let it air-dry for a while until it becomes a little damp. Work on some volumizing mousse through your hair to give it more body as well as a natural look when it dries up. Part your hair into four sections. Using scrunchies, twist the first section round and round, and as tight as you want them. Loose twists mean loose curls. Clip it up to a bun. Then, do the same thing with the rest of the sections. Leave the buns on for 1–2 hours, and then let them loose. Flip over your head and scrunch your hair with your hands to give it body and definition.

To achieve the side-sweep part, drag one section of your hair to the other side and secure them with bobby pins. For the finishing touch, finger-comb it or use some cream or spray to get rid of the unruly ones. The messier the better, good luck! 

Slicked Back Hair

$
0
0
Well if you ever wondered how to make this very slicked hairstyle here's a tutorial from Love Aesthetics. The blogger, Ivania Caprio, has that unusuall style that shines on her personality. That's why I love her blog, it's so beautiful, and represents the minimalicstic lifestyle. And so is this hairstyle. I only saw it on runways last year (but they're coming back this year too! Only in sleak ponytails, buns and more...). Learn how to make it:


Inspiration/ Ebba Zingmark

$
0
0
Okay, first I probably have to write a huge alpology letter to all of my folowers who have waited this long for a post. I'm really sorry, but, school started and I've been busy (sorry, I always say that, but It's true). There's a lack of new tutorials so when I find one new I promise, I will post it right away. Untill then I think I should make this blog a little more personal, and post things like my new fashion inspirations. There are some amazing people all around the wold! And this girl is just the  beggining. But, these kinds of posts won't be posted like, all the time, just once a month (maybe). Take a look at these gorgeous girl and her amazing & original fashion sense:

EBBA ZINGMARK 
She's a 16 year old girl from a little town in northern Sweden. And besides being a student she's also working as a fashion blogger at the swedish fashion-site modette.se. Visit it here. I love her blog because she is fearless when it comes to showing her style and she shows her complete personality throught her blog. Every post is well thought and I love to read them. She always creates original wearable combinations that I have never thought it could be put together! She is really talented!


“At most I get my inspiration from my friends and people around me, and because the styles of the persons who inspires me is very varieted my own style gets very mixed. I love looking a little bit fairytale, but still in an edgy way” – Ebba 
the rest of the interwiew (x) 

Red Carpet: MTV EMA 2012

$
0
0
Hey! I haven't posted for a while... sorry for that. But, as you already know, something really amazing is happening right now as I'm writing this post. Yeah, that's right - the 2012 MTV European Awards! Follow everything live now right here! And stay tuned with everything by going to tv.mtvema.com! Heidi Klum, I have to say looks so beautiful! I'm so excited! So here are my top 4 red carpet looks from this year's EMA:

The first look is from the gorgeous Taylor Swift, who looked absolutely enchanting in this haute couture J. Mendel dress. Her whole look was so elegant and feminine, just the words to describe her personality. So, I think she deserved the Best Look award, because she really looked  gorgeous. Nice work Taylor!

Next, there's the uprising star Rita Ora. She looked so different from all the girls on the red carpet in this Marchesa dress. And I really liked it, so cute and has elegance. Gorgeous combination! Rita really did her homework! 

Also another uprising star, the inevitable Lana Del Rey. She had so much class in that simple blue silk dress. Absolutely divine and simple. Very good for your first EMAs!

 And last, but not the least, the super mom Alicia Keys. Also keeping it simple in this beautiful Stella McCartney dress. Nice accessories and makeup, and all in all a great combination! Don't forget her fire preformance at the EMAs, she really was the girl on fire! 


Who was your favorite? 

Red carpet: Kristen Stewart looks at the 'Breaking Dawn Part 2' premieres

$
0
0
Hey guys! I've been following the events that have been happening in the past few weeks and one of them in the wold premiere of the last epic ending of 'The Twilight Saga: Breaking Dawn Part 2'. I haven't watched it still, but I will soon. Untill that, here's the total roundup from all of the looks that Kristen wore at the premieres in L.A, London, Madrid and Berlin.


First, there's the picutre from the L.A. premiere and she looked so divine. With that transparent nude lace that creates that certan look,  and with the makeup she was so elegant that i can't even. But, enought about that.

The second pic is a very bold look. I liked that she goes a little bold in fashion. Anyway that nice transparent black laced overall is very nice. Feminine. I liked it!

Okay, so the next dress is from the Madrid premiere and is much less elegant than the other dresses. But that is a very flirty, summer dress in the color - fluorescent yellow, and we can's forget the heels. They are like a big finishing touch to the look and breaking all the yellow.

At the end there's the beautiful gold dress (wich is my favorite) at the Berlin premiere. I just love the way the dress looks on her, and the beautiful gold makeup, made her look fawless.  But which one of these is your favorite? 

Holiday Hairstyle Inspiration

$
0
0
Hey! I haven't posted anything a long time ago... sorry about that. But I'm very happy today, because here, it's Christmas! I've spent this day wathching some Christmas movies like 'Home Alone' with my family and of course, eating! And I am so excited, so It seemed nice to post sometnig finaly. So, these are my top three festive, kinda, holiday inspired hairstyles, and I have a tutorial for each one of them! I hope you'll enjoy it! And Merry Christmas to everyone who is celebrating it today just like me!!!


No1: Loosley Curled Chignon
This is a tutorial I found on She Lets Her Hair Down, (actually I found all of these tutorials there) and I really like that blog! It's so inspirational, and you can really find any hair tutorial! I love it, thank you! 

Prep your hair by spraying hair spray all over it and brushing it through twice to have a texture that can easily be molded. You need that "dirty" texture in order for your hair to hold a curl and to achieve a hairstyle like this. 

Separate a section of hair at the top of your head and clip it out of the way.
Curl all of the rest of your hair in whichever direction you'd like. This doesn't need to have a rhyme or reason to it because it is just to give your hair texture. Once it is all curled, separate the curled hair into two equal sections and twist them until you reach your ends. 

Keep twisting them together and overlap the two sections over and over to create a loose bun at the back of your head. Pin the bun in place using strong bobby pins. Don't make it too tight on the sides. Take down the section of hair at the top of your head and curl it all going back and away from your face. Loosely separate the curls with your fingers.

Bring the curled hair at the top of your head back towards your bun and twist the ends so you can pin it into place. Loosely pin the top section towards the back using hair pins. The look should be loose and have a little bit more volume at the top than on the sides. 


No2: Mini Crown Braid
As always, it's best to have slightly dirty hair so your braids stay in place and so you can easily attach pins into your hair. Here are some products you can use to give your hair that "dirty hair" texture.


 Start with a small triangle section on one side of your middle part. Split that small section into three smaller sections. Start a normal three strand braid by taking the section that is closest to your middle part and bringing it under the middle section making it now the middle section. Now take the section closest to your forehead and bring it under the middle section.

You're now going to add hair to your three strand braid by taking a long section from your middle part to where your braid is laying. Add that hair into the section that is closest to your middle part.

Now take that whole section under the middle one making it the new middle. Next, take the section closest to your forehead and bring it under the middle section (you're not adding hair on this side). Now you will repeat steps 4 and 5 until you reach the end of your middle part (about 3 times).


After reaching the end of your middle part, you will continue braiding like normal without adding hair.
Once you absolutely can't braid that hair anymore, you can tie it off with a small elastic band or with a bobby pin.Repeat the same braid on the other side and secure it at the end.

Wrap each braid around your head and pin the ends into the braid on the other side. Hide your pins and the ends of your hair by tucking them under the other braid. It might help to add some hairspray to the spot where you will pin the ends into to make sure the pins and braid stay in place.


No3: Stars Chignon
I already posted a very similar tutrorial, you can look up the tutrorial here. But If you would like if you want to look up the whole tutorial go to She Lets Her Hair Down. Here's a quick gif to show you how to warp the chignon, and for the rest well, I already posted the link. 
Don't forgent to get the "dirty" texture, it's essential. You will need strong bobbi pins, hairspray and an  festive accessorie (optional).  


The star bobbi pins are as I said, optional. Here is the original DIY tutorial for the star bobbi pins that she used here, or you can buy also similar bobbi pins on Ebay

Good luck!

Big Classic Bouffant

$
0
0
I really am a fan of this look, and I always was. It's so classic, feminine and the dramatic cat eye eyeliner is probably my absolute favorite look, although I don't wear it. Anyway, I found this handy tutorial on Bobby Glam Blog, and If you want to check it out you will find lots of these classic hair tutorials. 


Firstly, you need to fit the Hair Booty hair extension to help achieve a big bouffant to rival Brigitte Bardot’s! You need to take a section from the front of your hair to pull back over the Hair Booty once it has been fitted. Like you can see in the pics above, if you have a fringe like me, take the section from behind your fringe. If not, begin so you are in line with your temple. Take a section about 2cm wide to cover the Booty.
Take the sectioned hair and secure with a sectioning clip to keep it out of the way whilst you are fitting your Hair Booty.
Now you need to fit your Hair Booty, the trick here is to put the Booty quite high up on your head as it creates a much bigger and more voluminous bouffant. So the clips of the Booty will be fitted on to the top of your head, with some falling around your crown area. Now, if you’re wanting a super duper bouffant you could always backcomb your hair before you fit the Booty. If you don’t want oodles of volume, you can skip this step … totally up to you.

Once you have your Booty fitted you then need to un-clip the section that you sectioned off in step 1. This will be pulled over to cover the Hair Booty. Backcomb this section a little and spritz with hairspray to ensure all of it is covered.
Pull all of your hair over to one side and secure in place with bobby pins. The side you choose is completely up to you; generally the same side as your fringe works best.

Then if you have a fringe, you need to pull this over and secure neatly with a bobby pin. If you don’t have a fringe you can just pull a section of hair to the side and secure it with a bobby pin too … it should still look the same.
Next you need to take your hair straighteners or curling tongs, whichever you prefer, and carefully add a few curls throughout the ends of your hair. Be sure to start the curl from the mid-lengths of your hair to achieve that classical look!

Textured Knot

$
0
0
Hey everyone! Long time no see! I can't wait to show you this new look, which has first appeared at the Band Of Outsiders fall 2013 show. This artfully rumpled style has been created by Duffy, a beauty expert. I've found this tutorial ( well, more like, a video) on Vogue.com on its top 10 stories from this week. I must say that this fashion season will be mostly marked by a little more classier and sleeaker hairstyles, but nevermind, because this is a great mixture of messy and classy! And even though this is a very casual style, it's the texture of the hair that makes it so exceptional!

For more info about the products used in this video (oh yeah, don't be afraid of clicking the link, It's not a virus or a pop-up, It will just open an extra tab and you will watch it there!) you can visit the Vogue page here. And as for the video, just follow this link: http://bcove.me/5i06rgeb


Kristen Stewart at the KCAs 2013: The Messy Fishtail

$
0
0
Hey everyone! I know it's been a long time since this year's KCA, and since all that time I've been admiring Kristen's whole look. From the cool playsuit to the amazing hair, I was blown. It just leaves an impression of youth and freedom combined with great fashion taste. Oh, and the purple smokey eyes, that the icing on the cake! I just loved it! Therefore I couldn't resist to post a great and easy hair tutorial that I've found here (click there to get more info on the products used) and plus, a makeup tutorial for her look!


Hair magician ADIR ABERGEL hooked the 22-year-old up for the night by styling her long auburn tresses in quite possibly the coolest fishtail braid I’ve ever seen. Using the Fekkai products he created this, undone, fresh and simple to recreate hairstyle. So, here is the hair tutorial (just wait a few seconds and the video will appear itself).

AND NOW, THE MAKEUP...


Kristen posed for the KCA cameras giving them a smouldering ultra-violet stare courtesy of her smoky deep purple eyes. Chanel Celebrity Makeup Artist JILLIAN DEMPSEY was inspired by both her eye color and the shade of her outfit.

Before starting, Jillian had to start with a clean palette.
“I prepped her skin with CHANEL Hydra Beauty Sèrum followed by CHANEL SublimageEssential Regenerating Fluid and then dabbed a little CHANEL Sublimage La Crème Yeux under her eyes.

I used a combination of CHANEL Vitalumière Aqua Ultra-Light Skin Perfecting Sunscreen Makeup Broad Spectrum SPF 15 on Kristen’s face and neck and CHANEL Correcteur Perfection Long Lasting Concealer with soft focus on pigments to conceal and event out her complexion.

On the apples of her cheeks, I lightly dusted CHANEL Powder Blush in Rose Initial. I then did a series of highlights on her upper cheekbones and bridge of her nose with CHANEL Exclusive Creation Poudre Signèe De Chanel Illuminating Powder.”

Now, for the eyes!
“The eyes were the cornerstone of this look. I chose CHANEL LES 4 OMBRES Quadra Eyeshadow in Vanitès and relied on the deep purple shade to add depth to Kristen’s eyes. I blended and layered metallic accents on her lids to intensify the purple shades using CHANEL Illusion D’Ombre Long Wear Luminous Eyeshadow in Mirifique. To continue the purple iridescence theme, I traced underneath her lower lashes with CHANEL Precision Eye Definer in Violet Smoke.

I also used CHANEL Stylo Yeux Waterproof Long Lasting Eyeliner in Black Shimmer on her upper lash line for extra definition.
I curled the lashes and added two coats of Le Volume de Chanel Mascara in Noir. I added a few individual lashes to finish.”

And for the perfectly pale pout?
Jillian used CHANEL Rouge Coco Shine Hydrating Sheer Lipshine in Candeur on her lips “for a natural, peachy nude hue.”

Clip in bangs - Zooey Deschanel look

$
0
0
Hey everyone! Today is a very special day here! It's the day before Easter and everyone is painting egs and just enjoying this great sunny weather! And since I'm feeling very excited, I thought that I should post something also very spring inspired - the Zooey Deschanel inspired hairstyle!  This tutorial I've found on Bobby Glam and I must say, all of their tutorials and posts are absoloutley amazing! All very nicely put together, I love it! I also have to say that the girl in the tutorial used a clip in fringe that you can buy in their shop here.


For the full tutorial, here is the video! 
It's a very classy look, prefect if you want to try something new! And while creating this hairstyle, don't panic if the moment you put you fringe in place it doesn't look good. 
It just needs a little ajusment and practice. Soon I'll
post a similar tutorial also incuding bangs, but created
in a different way, so untill then, have fun creating this,
fun, edgy but still very classy hairstyle!

Happy Friday friends! 

No Heat Beach Waves

$
0
0
There are loads of diferent types of these no heat tutorials for this beachy hair look, and the reason to that is that most people (including me) just love that messy hair. And if you don't, just remember - embrace it! It's an all time (or maybe I should've said immortal) hairstyle that goes with everything! It's playful and can give that 'wow' effect on your whole look. So, I had to do some serious searching to find the perfect tutorial that can do the trick - and i found it! It's an easy breezy tutorial posted by the amazing Aimee Song from Song of Style. All the redit goes to her and her amazing trick! 

1. Part your slightly damp hair into two sections (right and left) and start twisting from the root to all the way to the end of your hair. Make sure you twist well!

2. Using a bobby pin, pin the end of your twisted hair to the crown of your head.

3. Twist the other side of your hair in the same direction (I normally twist outwards) and pin to the crown of your head like the first side.

4. Let your hair dry naturally overnight and in the morning, unpin the ends. Shake your head and pretend your in a shampoo commercial, and voila! You got waves! If you'd like to hold the waves, top off the look with a lightweight hairspray such as the Vida Sassoon Pro Series Flexible Hold Hairspray.


Neitzsche mephostophilis

Viewing all 80 articles
Browse latest View live